Using Green Screens: The When & The How
With the proliferation of high-definition video streaming and devices, it’s becoming increasingly obvious to differentiate between well-done and amateur green screening (also known as chroma keying). Because of this obvious gap in quality, it is not only important to know how to film a subject on a green screen but also be stringent on when to use one.

When to Use a Green Screen
Green screens are used to place a subject, whether that is a person or product, into an environment or situation that is not available for filming. Because green is not a typical color in people it contrasts with them and makes it easy for editing software to remove the all-green background leaving only the subject.
If possible, look for alternative options for your project before deciding to green screen. Green screens should only be used when no other scenario will do. For instance, setting up a background environment
or using a backdrop allows elements like lighting, focus and color balance to stay consistent between the foreground and background and keep the video looking natural. Adding elements like plants or paintings behind the subject and not filming flat against a wall can add depth and character to your shot.
However, there may be times where green screening is necessary, such as in an off-site digital studio or when the subject needs to be visible in a different, identifiable city. When green screening there are some important steps needed to capture the best possible footage.
Composition & Lighting

Strategically placing your subject and lighting them properly are two of the most important steps to take when using a green screen. To begin, make sure that the green screen itself is free of any wrinkles or folds.
Poorly lit footage makes it difficult to differentiate between the subject and background in video editing software and can also make the subject look like they don’t belong in the inserted background. Unless needed for dramatic effect, proper lighting should not cast any harsh shadows and should illuminate the entire subject evenly. Using soft lighting and filters such as softboxes will help with this. You’ll want your subject to look like they belong in the environment they’re being placed in and lighting is the most critical part of this process.

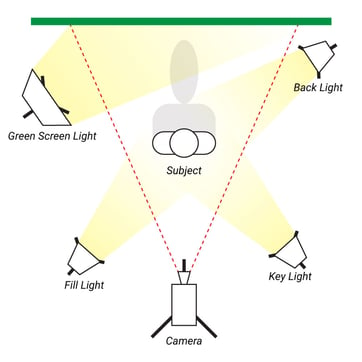
Lighting should also provide the subject with a hard edge making them truly stand out. In order to create this edge make use of back lights that light the back of the subject separating them from the background. An evenly lit and flat background will also reduce shadows and light flares and allow easier keying without artifacting. Fuller, brighter lights will also reduce the amount of grain and noise in the video, again preventing blending between the foreground and background.
Using a proper lighting kit and set-up is the major differentiator between professional and amateur looking video but positioning the subject cannot be overlooked.

Properly positioning the subject in frame can prevent blending and also allows a fuller range of movement when editing. Ideally the subject should be horizontally placed in the middle of the frame. This gives the editor the most freedom to place the final background and ensures that any movements from the subject are not cut-off. Vertically the subject should be given ample headroom allowing any vertical movements to happen without cropping. The subject does not need to be fully visible, head to toe in the frame, but enough of the subject should be shown to allow the editor to scale in if needed.
 The subject should also be set far enough away from the green screen that their shadows don’t cast on it but the edges of the green screen can’t be seen. This will also prevent green light from reflecting off the background and onto the subject. Rule of thumb, if you can see shadows from the subject on the green screen they are too close.
Consider these 8-Steps when placing and lighting your subject:

- The subject should be in the center of the green screen (allowing movement horizontally and vertically)
- Subject should be approximately 5-feet away from the screen
- Ensure there are no wrinkles or folds in your green screen
- Light your entire subject evenly
- Avoid any harsh shadows - soft lighting and filters can help
- Light your subject from behind
- Ensure there are no shadows
- Commence filming!
Camera Settings

After the lighting and composition are set, the next step is making sure the camera settings are properly configured. Be sure to use manual camera settings when filming since the large amount of green on screen can cause problems with automatic settings. Below is a checklist of settings to go over to make sure the final product is the highest possible quality:
- Make sure that your color balance is correct and that the subject looks similar both on and off camera - the color temperature should match the lights that are being used to light the subject (for more on color balance check out this resource from X-Company)
- Use a lower ISO without darkening the picture too much in order to reduce the grain and noise in the final video, try starting with the lowest setting on your camera and adjusting it as needed.
- Use a medium aperture to reduce the depth of field effects on the subject, while at the same time keeping the green screen out of focus to mask any irregularities, we suggest using an aperture between 5.0 - 8.0 on most cameras
- Get the subject in the sharpest focus possible, and together with your aperture make sure that they don’t fall out of focus with any movements
- Filming with a higher shutter speed can also reduce motion blur and prevent blending, however it is not absolutely necessary to change this setting.
- Finally, all the settings together should ensure that the subject is neither underexposed or overexposed
Other Considerations
Beyond the basics of setting up and using a green screen there are still other aspects to consider if you want the best results possible.
First, try to limit the amount of physical green screen being used. Meaning that in your setup, only the area that will be on camera should be set up with the green screen. Too much green in the room will cause green light to reflect back on your subject and cause a “green spill,” softening edges and potentially causing artifacting.
Also, make sure to consider the items included with the subject in the shot. If someone is wearing green clothing it will be removed with the green screen and cause editing issues. The same goes for any props, for example props, pens or plants that might need to be included in the shot. If you are shooting any green items consider using a bright blue background instead but keep in mind that all the same rules apply.
-----
When exploring your next video project ask yourself if green screening is right for the project. If so, we hope these guidelines are helpful for your internal video crew.
Looking for something more? Check out our filming capabilities and all that Association TV® has to offer.
Or, explore some great examples of successful green screen videos, here.
Sources:
https://nofilmschool.com/tips-help-you-green-screen-champion
https://www.premiumbeat.com/blog/tips-shooting-blue-green-screen/
https://filmlifestyle.com/green-screen/
